
Set Up Musashi Testnet Pool
In this guide, we will walk you through how to set up a Musashi testnet pool using the Dingo node.
This guide splits the setup into two sections:
- Dingo Node Setup.
- Musashi Testnet Pool Registration.
Section 1 - Dingo Node Setup
Section titled “Section 1 - Dingo Node Setup”✅ This guide assumes a typical Linux setup. Please adjust commands and paths as needed.
Step 1 - Create Working Directory
Section titled “Step 1 - Create Working Directory”We will create a directory for all our files related to the pool setup.
First export directory path to .bashrc by running:
echo 'export DINGO_HOME=~/dingo-leios-testnet' >> ~/.bashrcsource ~/.bashrcNext create directory:
mkdir -p "$DINGO_HOME"You can verify by running:
Step 2 - Download Dingo Binary
Section titled “Step 2 - Download Dingo Binary”Download the latest release from the Dingo releases page.
⚠️ Adjust the version and architecture to match your system.
cd $DINGO_HOMEwget https://github.com/blinklabs-io/dingo/releases/download/v0.70.7/dingo-v0.70.7-linux-amd64.tar.gz -O - | tar -xzYou can verify the binary version by running:
./dingo versionMove the Dingo binary to /usr/local/bin/ so it is accessible system-wide.
Copy the binary:
sudo cp $DINGO_HOME/dingo /usr/local/bin/✅ You can verify the binary was copied by running
which dingo
Step 3 -Download the Leios Cardano-CLI binary
Section titled “Step 3 -Download the Leios Cardano-CLI binary”Make directory and move into it:
mkdir -p "$DINGO_HOME/cli" && cd "$DINGO_HOME/cli"Download the Cardano-CLI binary and run the following command:
wget https://github.com/input-output-hk/ouroboros-leios/releases/download/prototype-2026w34/cardano-node-leios-x86_64-linux.tar.gz -O - | tar -xzMove cardano-cli to/usr/local/bin` by running:
cd binsudo mv cardano-cli-x86_64-linux /usr/local/bin/cardano-cliRemove unneeded files:
cd $DINGO_HOMErm -rf cliWe need the Shelley Genesis JSON file to run some of our CLI commands.
For this example, we will use the following directory structure $DINGO_HOME/config/. The following command will create the directory and move into that directory:
mkdir -p "$DINGO_HOME/config" && cd "$DINGO_HOME/config"To download the Shelley Genesis file, run:
wget https://book.play.dev.cardano.org/environments-pre/leios/shelley-genesis.json💡 Tip: Cardano Configuration Files can be found at https://book.play.dev.cardano.org/adv-musashi.html
Step 4 - Create dingo.yaml Configuration File
Section titled “Step 4 - Create dingo.yaml Configuration File”Dingo ships with embedded Cardano network configurations (genesis files and config.json) for Musashi, so you do not need to download them separately.
- First create needed directories:
sudo mkdir -p /etc/dingoand
mkdir -p $DINGO_HOME/.dingo- Then create
dingo.yamlfile:
The
$DINGO_HOMEvariable will automatically expand to your home directory path.
sudo bash -c "cat <<EOF > /etc/dingo/dingo.yaml# Global data directory for both blob and metadata storage plugins.# Can be overridden with CARDANO_DATABASE_PATH or --data-dir.databasePath: \"$DINGO_HOME/.dingo\"
# Networknetwork: \"musashi\"relayPort: 3010socketPath: \"$DINGO_HOME/dingo.socket\"
# Path to the topology configuration file for Cardano nodetopology: \"$DINGO_HOME/config/topology.json\"
EOF"
You can view and verify dingo.yaml file by running:
sudo nano /etc/dingo/dingo.yaml💡 Tip: Make sure port 3010 is open.
Step 5 - Setup Topology File
Section titled “Step 5 - Setup Topology File”If you plan a standard setup of a BP behind relays you can skip this step
First download the topology file to your $DINGO_HOME/config directory by running:
cd $DINGO_HOME/configwget https://book.play.dev.cardano.org/environments-pre/leios/topology.jsonThen download peer-snapshot JSON file:
cd $DINGO_HOME/configwget https://book.play.dev.cardano.org/environments-pre/leios/peer-snapshot.json💡 Tip: Cardano Configuration Files can be found at https://book.play.dev.cardano.org/adv-musashi.html
To help with initial sync, we will use the Kleioscan explorer to find peers to connect to.
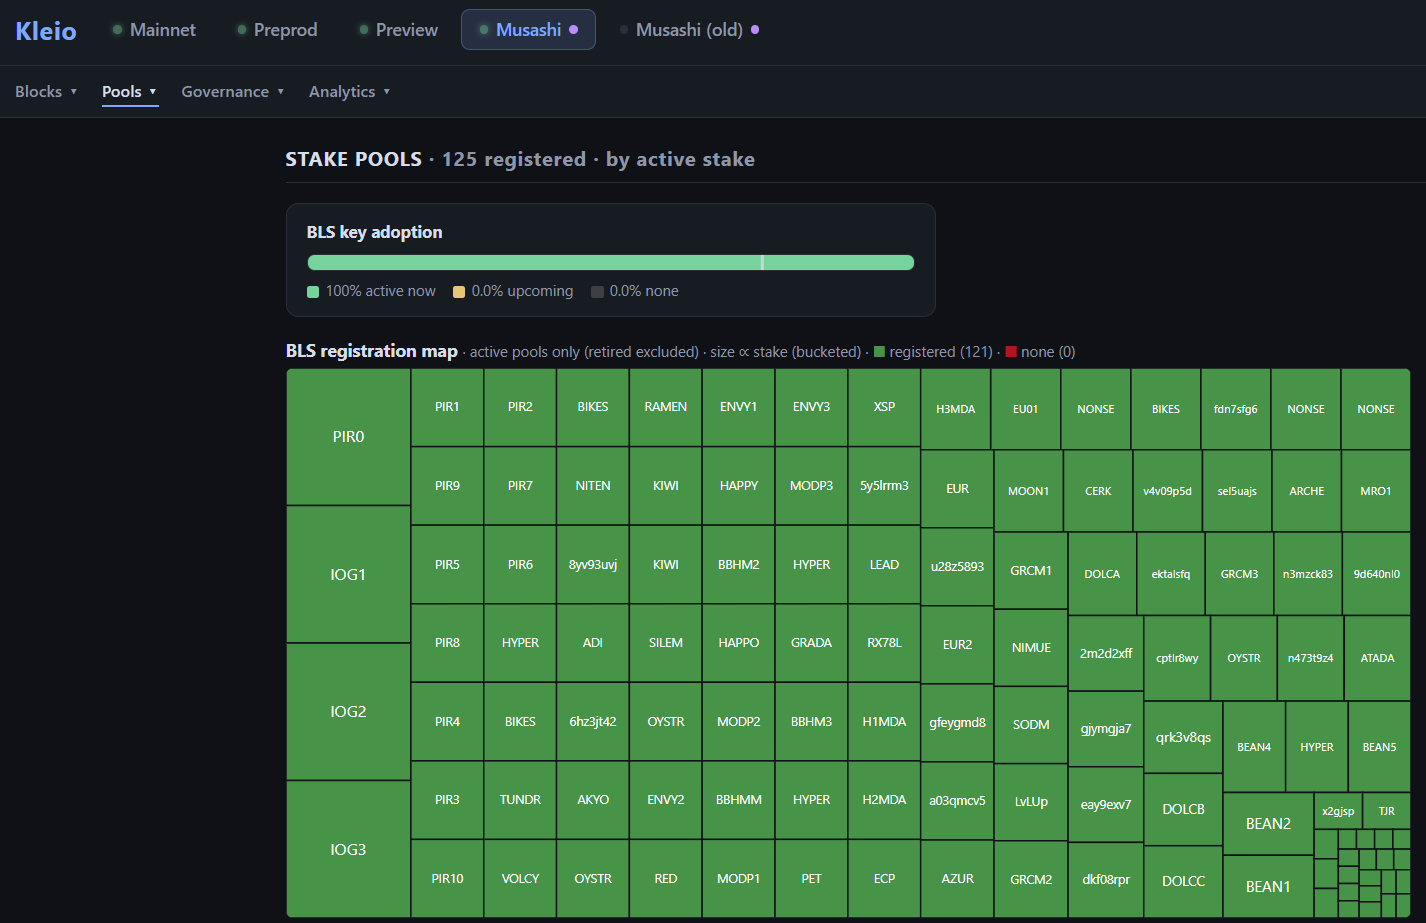
- Click on some of your SPO friends and copy 📝 their public IPs and Ports
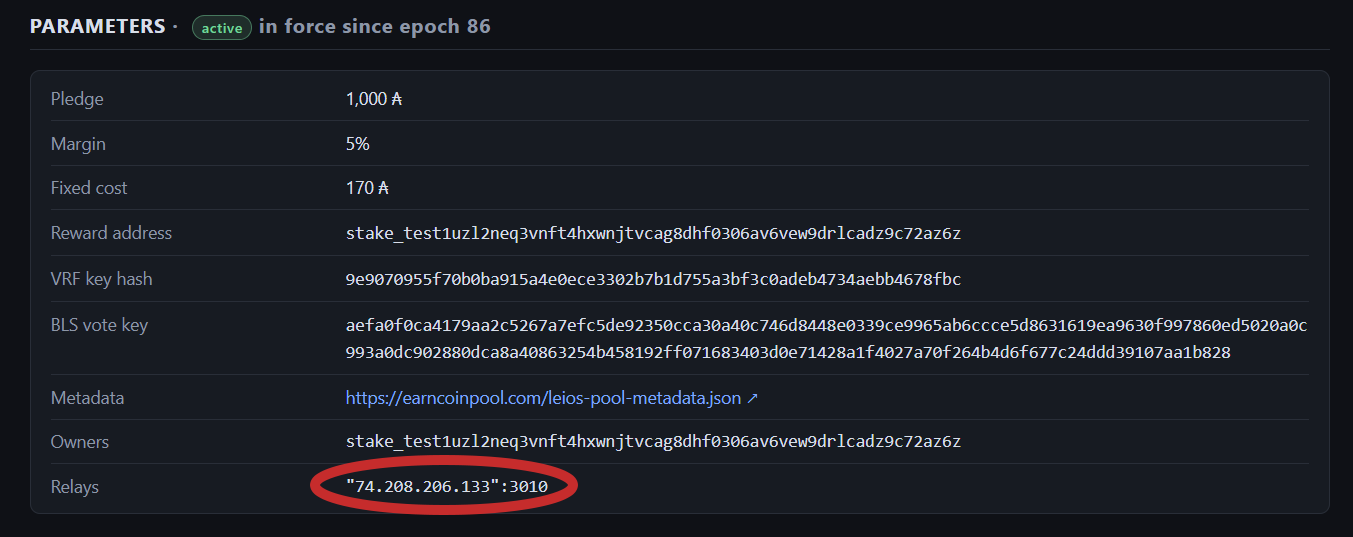
- Use the IPs and Ports to edit your
localRootsin yourtopology.jsonfile by running:
sudo nano $DINGO_HOME/config/topology.json- Then edit
localRootssection by adding your friends’ pools. (For this example, we just added 3 pools.)
Example topology file:
{ "bootstrapPeers": [ { "address": "leios-node.play.dev.cardano.org", "port": 3001 } ], "localRoots": [ { "accessPoints": [ { "address": "74.208.206.133", "port": 3010 }, { "address": "cerk-musashi.ddns.net", "port": 3001 }, { "address": "74.122.122.121", "port": 6400 } ], "advertise": false, "trustable": false, "valency": 3 } ], "peerSnapshotFile": "peer-snapshot.json", "publicRoots": [ { "accessPoints": [], "advertise": false } ], "useLedgerAfterSlot": 64800}Save and exit.
Step 6 - Create dingo.service Unit File
Section titled “Step 6 - Create dingo.service Unit File”Create the systemd service file. Replace YOUR_USER with your Linux username (echo $USER):
cat <<ENDFILE | sudo tee /etc/systemd/system/dingo.service > /dev/null[Unit]Description=Dingo NodeAfter=network-online.target
[Service]Type=simpleRestart=on-failureRestartSec=10User=YOUR_USERExecStart=/usr/local/bin/dingo serve --config /etc/dingo/dingo.yamlSyslogIdentifier=dingoTimeoutStopSec=5
[Install]WantedBy=multi-user.targetENDFILE
We can view and verify our dingo.service file by running:
sudo nano /etc/systemd/system/dingo.serviceStep 7 - Enable and Start the Service
Section titled “Step 7 - Enable and Start the Service”Enable the service to start on boot and start it now:
sudo systemctl daemon-reloadsudo systemctl enable dingo.servicesudo systemctl start dingo.serviceStep 8 - Check Status
Section titled “Step 8 - Check Status”Verify the service is running:
sudo systemctl status dingo.serviceTo follow the logs in real time:
sudo journalctl -u dingo -fTo see recent logs if there is an error:
sudo journalctl -u dingo -n 50 --no-pagerCongratulations! You can now move to the Musashi Testnet Pool Registration section
Section titled “Congratulations! You can now move to the Musashi Testnet Pool Registration section”Section 2 - Musashi Testnet Pool Registration
Section titled “Section 2 - Musashi Testnet Pool Registration”Make sure the node is fully synced before proceeding. To follow the logs in real time:
Step 1 - Add Environment Variables
Section titled “Step 1 - Add Environment Variables”Open your bashrc:
nano ~/.bashrcAdd the environment variables:
export CARDANO_NODE_NETWORK_ID=164export CARDANO_NODE_SOCKET_PATH="$DINGO_HOME/dingo.socket"Save and exit.
Reload your bashrc:
source ~/.bashrcYou can verify your environment variables by running:
Run this command to see if the node is 100% synced.
Step 2 - Create keys Folder
Section titled “Step 2 - Create keys Folder”We will create a keys folder for all our pool keys and cert files. The following command will create directory and move into that directory.
mkdir -p "$DINGO_HOME/keys" && cd "$DINGO_HOME/keys"Step 3 - Create Payment and Stake Keys
Section titled “Step 3 - Create Payment and Stake Keys”Create payment keys:
cardano-cli dijkstra address key-gen \ --verification-key-file payment.vkey \ --signing-key-file payment.skeyCreate stake keys:
cardano-cli dijkstra stake-address key-gen \ --verification-key-file stake.vkey \ --signing-key-file stake.skeyStep 4 - Create Payment Address
Section titled “Step 4 - Create Payment Address”Create payment address and payment.addr file
cardano-cli dijkstra address build \ --payment-verification-key-file payment.vkey \ --stake-verification-key-file stake.vkey \ --out-file payment.addrSee your payment address and copy it by running:
cat payment.addrStep 5 - Fund Address
Section titled “Step 5 - Fund Address”Go to the faucet and paste your address from above.
https://faucet.leios.play.dev.cardano.org/basic-faucet
You can confirm Tada was received by running:
Step 6 - Create Node Operational Keys
Section titled “Step 6 - Create Node Operational Keys”Create Cold keys, KES keys and VRF keys
Cold keys (your pool’s identity — keep offline / backed up)
cardano-cli dijkstra node key-gen \ --cold-verification-key-file cold.vkey \ --cold-signing-key-file cold.skey \ --operational-certificate-issue-counter-file opcert.counterKES keys (hot keys, rotated periodically)
cardano-cli dijkstra node key-gen-KES \ --verification-key-file kes.vkey \ --signing-key-file kes.skeyVRF keys (used to win block-production slots)
cardano-cli dijkstra node key-gen-VRF \ --verification-key-file vrf.vkey \ --signing-key-file vrf.skeyStep 7 - Create BLS Keys
Section titled “Step 7 - Create BLS Keys”BLS keys are keys that pools use to vote on and certify endorser blocks. You need them to register a Leios-enabled stake pool.
BLS key pair (Leios voting/certification key)
cardano-cli dijkstra node key-gen-BLS \ --verification-key-file bls.vkey \ --signing-key-file bls.skeyStep 8 - Create Operational Certificate
Section titled “Step 8 - Create Operational Certificate”We can find the starting KES period by running:
slotsPerKESPeriod=$(jq -r '.slotsPerKESPeriod' "$DINGO_HOME/config/shelley-genesis.json")slotNo=$(cardano-cli query tip | jq -r '.slot')kesPeriod=$(( slotNo / slotsPerKESPeriod ))Now run the following command to create node.cert:
cardano-cli dijkstra node issue-op-cert \ --kes-verification-key-file kes.vkey \ --cold-signing-key-file cold.skey \ --operational-certificate-issue-counter-file opcert.counter \ --kes-period "$kesPeriod" \ --out-file node.certStep 9 - Create your pool’s metadata JSON file
Section titled “Step 9 - Create your pool’s metadata JSON file”Update the values below with your pool’s information.
📝 ticker must be between 3-5 characters in length 📝 description cannot exceed 255 characters in length.
cat > leios-pool-metadata.json << EOF{"name": "MyPoolName","description": "My pool description","ticker": "ABC","homepage": "https://pool-Website.com"}EOFCalculate the metadata hash
Calculate the hash of your metadata file. The hash is saved to leiosPoolMetaDataHash.txt
cardano-cli dijkstra stake-pool metadata-hash \--pool-metadata-file leios-pool-metadata.json \--out-file leiosPoolMetaDataHash.txtUpload leios-pool-metadata.json to a public website
Upload your leios-pool-metadata.json file to a website that you administer or a public Web site. For example, you can upload your pool metadata to GitHub. See Coincashew guide here for uploading to GitHub.
Verify the metadata hashes First retrieve the metadata hash from your metadata JSON URL.
- Replace https://www.METADATA-URL.com with your actual URL from above.
cardano-cli dijkstra stake-pool metadata-hash --pool-metadata-file <(curl -s -L <https://www.METADATA-URL.com>)Verify that this hash matches the value here:
cat leiosPoolMetaDataHash.txtStep 10 - Register Stake Address and Pool
Section titled “Step 10 - Register Stake Address and Pool”Build both Stake and Pool certificates, then submit them in a single transaction.
Stake-address registration certificate:
cardano-cli dijkstra stake-address registration-certificate \ --stake-verification-key-file stake.vkey \ --key-reg-deposit-amt "$(cardano-cli dijkstra query gov-state | jq .currentPParams.stakeAddressDeposit)" \ --out-file stake-reg.certPool registration certificate:
- Replace
<YOUR_PUBLIC_IP>with your node’s public IP (the address other nodes will use to reach it). - Also replace https://website.com/leios-pool-metadata.json with your URL from above.
After replacing <YOUR_PUBLIC_IP> and <https://website.com/leios-pool-metadata.json> run:
cardano-cli dijkstra stake-pool registration-certificate \ --cold-verification-key-file cold.vkey \ --vrf-verification-key-file vrf.vkey \ --bls-signing-key-file bls.skey \ --pool-pledge 1000000000 \ --pool-cost 170000000 \ --pool-margin 0.05 \ --pool-reward-account-verification-key-file stake.vkey \ --pool-owner-stake-verification-key-file stake.vkey \ --pool-relay-ipv4 <YOUR_PUBLIC_IP> \ --pool-relay-port 3010 \ --metadata-url <https://website.com/leios-pool-metadata.json> \ --metadata-hash $(cat leiosPoolMetaDataHash.txt) \ --out-file pool-reg.certSubmit both certificates in one transaction.
Get UTxO for tx-in by running:
TXIN=$(cardano-cli dijkstra query utxo --address "$(cat payment.addr)" | jq -r 'keys[0]')Build raw transaction by running:
cardano-cli dijkstra transaction build \ --tx-in "$TXIN" \ --change-address "$(cat payment.addr)" \ --certificate-file stake-reg.cert \ --certificate-file pool-reg.cert \ --out-file pool-reg-tx.rawSign Transaction by running:
cardano-cli dijkstra transaction sign \ --tx-body-file pool-reg-tx.raw \ --signing-key-file payment.skey \ --signing-key-file stake.skey \ --signing-key-file cold.skey \ --out-file pool-reg-tx.signedSubmit Transaction by running:
cardano-cli dijkstra transaction submit \ --tx-file pool-reg-tx.signedStep 11 - Delegate Stake to Your Pool
Section titled “Step 11 - Delegate Stake to Your Pool”Build a delegation certificate and submit it in its own transaction.
Create delegation cert by running:
cardano-cli dijkstra stake-address stake-delegation-certificate \ --stake-verification-key-file stake.vkey \ --cold-verification-key-file cold.vkey \ --out-file delegation.certGet UTxO for tx-in by running:
TXIN=$(cardano-cli dijkstra query utxo --address "$(cat payment.addr)" | jq -r 'keys[0]')Build raw transaction by running:
cardano-cli dijkstra transaction build \ --tx-in "$TXIN" \ --change-address "$(cat payment.addr)" \ --certificate-file delegation.cert \ --out-file delegation-tx.rawSign Transaction by running:
cardano-cli dijkstra transaction sign \ --tx-body-file delegation-tx.raw \ --signing-key-file payment.skey \ --signing-key-file stake.skey \ --out-file delegation-tx.signedSubmit Transaction by running:
cardano-cli dijkstra transaction submit \ --tx-file delegation-tx.signedStep 12 - Get bech32 Id
Section titled “Step 12 - Get bech32 Id”cardano-cli dijkstra stake-pool id --output-bech32 --cold-verification-key-file cold.vkeyexample: pool1…
Go to faucet and request delegation for your pool.
Paste your pool id from above. https://faucet.leios.play.dev.cardano.org/basic-faucet
Verify Registration Capture your pool id (from the cold key) and your stake address by running:
POOL_ID=$(cardano-cli dijkstra stake-pool id --cold-verification-key-file cold.vkey --output-format hex)STAKE_ADDR=$(cardano-cli dijkstra stake-address build --stake-verification-key-file stake.vkey)echo "pool id: $POOL_ID"echo "stake address: $STAKE_ADDR"Check the pool is registered on-chain — this should print your pool’s parameters (pledge, cost, margin, VRF):
cardano-cli dijkstra query pool-state --stake-pool-id "$POOL_ID"Check the delegation took effect — stakeDelegation should point at your pool id:
cardano-cli dijkstra query stake-address-info --address "$STAKE_ADDR"Step 13 - Update your dingo.yaml with the new KES key, VRF key and Operational Certificate
Section titled “Step 13 - Update your dingo.yaml with the new KES key, VRF key and Operational Certificate”Stop the Dingo node by running:
sudo systemctl stop dingoAdd the following lines to your dingo.yaml file by running:
sudo bash -c "cat <<EOF >> /etc/dingo/dingo.yaml# Validator / block producer (core storage, API ports ignored):blockProducer: trueshelleyVrfKey: \"$DINGO_HOME/keys/vrf.skey\"shelleyKesKey: \"$DINGO_HOME/keys/kes.skey\"shelleyOperationalCertificate: \"$DINGO_HOME/keys/node.cert\"EOF"You can view and verify our dingo.yaml file by running:
sudo nano /etc/dingo/dingo.yamlStep 14 - Start Dingo Node
Section titled “Step 14 - Start Dingo Node”sudo systemctl start dingoStep 15 - Check Status
Section titled “Step 15 - Check Status”Verify that Dingo is running:
sudo systemctl status dingoTo follow the logs in real time:
sudo journalctl -u dingo -fTo see recent logs if there is an error:
sudo journalctl -u dingo -n 50 --no-pagerCongratulations! You have a Leios Dingo Node running on the Musashi Testnet.
Section titled “Congratulations! You have a Leios Dingo Node running on the Musashi Testnet.”If you want to participate in the Musashi Testnet Rewards Program for SPO go here and fill out the form https://leios.cardano-scaling.org/docs/testnet/rewards-program
Credit to original guides and additional resource here https://leios.cardano-scaling.org/docs/testnet/getting-started